Batch Processing
Use batch processing to automatically process image files. The batch processing tool processes multiple bracketed sets in one step, which can save you a lot of time when you have many bracketed sets to render.
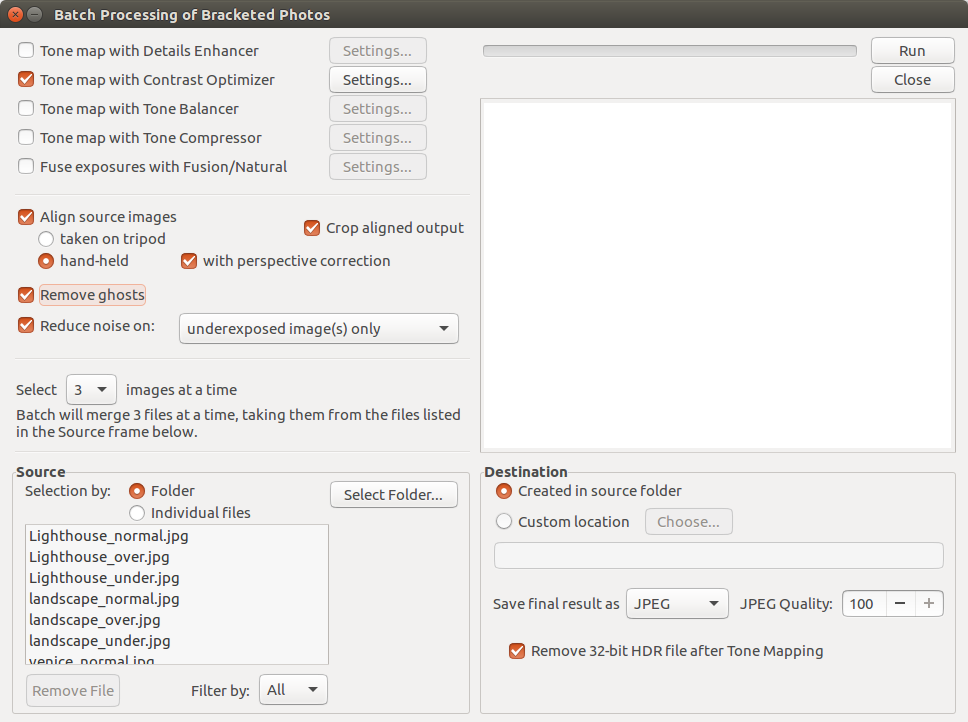
Bath Processing of Bracketed Photos dialog
To batch process multiple sets of bracketed photos follow these steps:
- Open the Batch Processing of Bracketed Photos window by selecting Batch Bracketed Photos from the Automate menu or using the Ctrl+B keyboard shortcut.
- Select how you would like to process the bracketed set, by checking one or more of the boxes at the top-left of the window.
- For each processing method you selected, click on the Settings... button to choose the settings for that method.
- Specify whether image alignment, ghost removal or noise reduction are needed. Image alignment is recommended, unless your bracketed sets are stitched panoramas or "fake" exposures derived from a single Raw file. Noise reduction is recommended too, especially with Raw files. However, ghost removal should be selected only for images that do need it, and left unchecked otherwise. For more details, refer to the Merge to HDR options section.
- Select the number of exposures to combine using the pull-down menu. For example, select "3" if your bracketed sets consist of three exposures each.
- In the Source section, select the folder where the bracketed photo sets are located. The files are arranged in alphabetical order. "N" files at a time are processed where "N" is the number you specified in the previous step.
- In the Destination section, select the output file type. When using JPEG file output, select the amount of JPEG compression. 100 gives the least compressed JPEG file, with most image quality retained.
- If you want to save the results in a different folder from the folder containing the source photos, select Custom Location option in the Destination section, and then click Choose.... Otherwise, select the default of Subfolder within Source Folder. This will create a subfolder with the name "PhotomatixResults" in the source folder selected in the Source section.
- Click Run to start batch processing
While the batch is running, the processing status will display in the area below the Run button. When processing is complete, the path to the batch results will be displayed.
Next: Appendix: HDR & Color Settings