This section describes how to load and merge bracketed image files of a scene taken under different exposure settings, as well as how to load single images into Photomatix Pro. Further on you can learn how to load a single image file for HDR adjustment.
Photomatix Pro works with bracketed images that are in 8-bit or 16-bit/channel mode, as well as Camera Raw files.
Supported file types include JPEG, TIFF, PSD, DNG, and Raw files from many camera models. Photomatix Pro is updated frequently to add support for Raw files of new camera models. You can check whether a new update of Photomatix Pro is available by choosing "Check for updates..." from the Help menu (Windows) or Photomatix Pro menu (Mac).
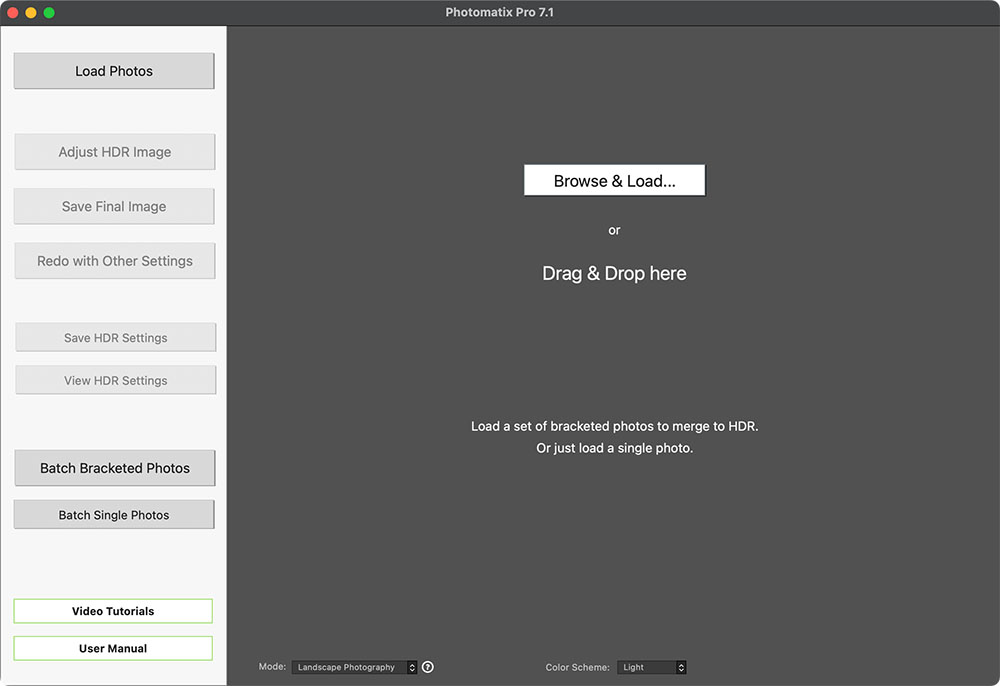
Drag and drop images here, or load images using a standard dialog
Loading a Bracketed Photo Set
To load bracketed image files, either simply Drag and drop them onto the app or app icon, or Browse for and Load them using the Open dialog.
Note
The term “bracketed images” refers to a sequence of images of the same scene taken under different exposure settings. A bracketed image set can be produced using a camera's Automatic Exposure Bracketing (AEB) function, if available. Without AEB any camera can still be used to produce a bracketed set, manually.
The Open dialog is accessed using the Browse & Load button (see screen shot above), or using the File menu. Once you are in the Open dialog, use the CTRL / Command key method, or the Shift key method, to select an image set:
The CTRL / Command key method:
- Click any image in the bracketed set
- Press and hold the Ctrl [PC] / Command [Mac] key
- Click the other images in the set
- Click Load
The Shift key method:
- Click the first image in the bracketed set
- Press and hold the Shift key
- Click the last image in the set (to select all between)
- Click Load
Note
If you have Lightroom Classic, you can use the Export to Photomatix Pro plugin for Lightroom to load images into Photomatix Pro.
If you have Capture One, you can use the Merge to HDR in Photomatix Pro plugin for Capture One.
Refer to the FAQ on the Photomatix website for more information.
The Selected Photos Window
Before merging your bracketed set into a single image file you can review the image thumbnails, and deselect any photos you may wish not to include in the merge (for example, a duplicate photo).

Selected photos, ready to "Choose Merge Options"
The Check Exposures button displays a dynamic range coverage evaluation of the currently selected photos.

Click Next: Choose Merge Options, if your bracketed set is complete and correct.
Note
The order of the files in a bracketing sequence does not matter. Photomatix Pro automatically sorts the images based on the exposure information in the image files' EXIF metadata. If exposure information is not available in the EXIF data, Photomatix Pro sorts the images by evaluating the relative brightness of the photos.
Entering Missing Exposure Values
If exposure information is not present in the metadata of the image files, or if there are any duplicate EV values, the Selected Photos dialog will display estimated relative Exposure Values.

Set or adjust missing exposure settings
If the estimated Exposure Values are incorrect, you can either click on and edit each one of them individually, or set global EV Spacing for the bracketed set.
Click Next: Choose Merge Options, once you've set the missing Exposure Values.
Single Image Files
Please refer to the section below for details about loading a single image.
Merge to HDR Options
After the bracketed photos are selected, you can customize the steps performed before merging the images, such as aligning the images or removing "ghosts".

Selecting options to merge to HDR
Alignment Options
The Align source images option is checked by default. It corrects misalignment problems when the camera moves slightly between the bracketed frames. Handheld bracketed sets have camera movement between frames, but even bracketed sets shot on a tripod can have some slight camera movement between frames as well, as can be caused by wind, for example.
Note
The Align source images option should not be checked when your source images are stitched panoramas or when they are "fake exposures" derived from a single Raw file.
The Crop aligned images option removes unneeded borders resulting from alignment adjustments. Without this, the merged image will have white areas around the edges. You should disable this option when you need the resulting image to have exactly the same width and height as the source images.
You can customize alignment settings depending on how the given bracketed set was taken:
Include perspective correction: This alignment option corrects for all types of camera movement, including rotation in all three dimensions, as well as horizontal, vertical, forward, and backward motion.
Maximum shift: Sets the maximum amount of camera movement between photos that the alignment will try to correct for, expressed as a percentage of the image size. Larger values increase the time required for alignment, but may be necessary when hand-held shots are taken when it is windy, or when using a long zoom lens.
The alignment Preset drop-down menu lets you select pre-defined alignment settings that are appropriate for particular shooting situations. The four presets offered are On Tripod, Hand-held (minimal movement), Hand-held (standard) and Hand-held (large shifts).
If you took the photos hand-held, the default preset, Hand-held (standard), is suitable in most cases. The Hand-held (minimal movement) preset is appropriate when the camera barely moved between the bracketed shots, and has the advantage of being faster. The Hand-held (large shifts) preset is for photos taken in conditions where significant camera movements are difficult to avoid. If you choose Hand-held (large shifts), a more extensive alignment search will be done, though at the expense of longer processing times.
Deghosting Options
Deghosting addresses the problem of artifacts that appear when combining the bracketed images of a dynamic scene. For example, if the moving subjects are people walking, the people will appear multiple times in the combined image, once for each frame, faded and in a different position as if they were “ghosts”. This is why artifacts that arise from movement in a scene are commonly referred to as “ghosting” and the techniques to eliminate them are referred to as “deghosting”.
Show options to remove ghosts enables the Deghosting Options window, which will then open after you select your merge to HDR options, and then click the Align & Show Deghosting button. The Deghosting Options window provides an adjustable image-wide Automatic Deghosting algorithm and, for more control over deghosting, a manually applied Selective Deghosting Tool. You can learn more about the deghosting options further on.
Noise Reduction Options
The Reduce noise on option processes source photos with a high-quality noise reduction algorithm, and is recommended when processing Raw files directly in Photomatix Pro.
Noise reduction is typically most helpful in dark areas of the source images, and these dark areas are more prevalent in the underexposed and, sometimes, in the normally exposed frames. With this in mind, you can use the Reduce noise on menu to specify that noise reduction be applied only to the darkest images in the bracketed set, to the normal and the darker images, or to all the images in the set.
Strength increases or decreases noise reduction strength relative to the automatically determined default strength value, which is based on the noise level in the image. Values range from 50% to 150%.

Noise reduction options
Reduce Chromatic Aberrations
The Reduce Chromatic Aberrations option automatically corrects color fringing due to chromatic aberrations of the lens. Checking this option is recommended, given that chromatic aberrations tend to show around high contrast edges, and are particularly an issue for HDR images.
Show the 32-bit HDR image after merging
This option opens the merged, but not yet processed, bracketed image set in a viewing window. This allows you to save the merged-but-unprocessed file in an HDR image file format such as Radiance or OpenEXR. Saving the 32-bit unprocessed merged image is useful when you want to be able to process the image with other settings later without having to load and merge your bracketed photos again. However, you will still need to load and merge the original photos again if you want to use Exposure Fusion.
Note
If you check Show the 32-bit HDR image after merging, when the unprocessed image is displayed you will have to click the Adjust HDR Image button, in the Workflow Shortcuts window, to continue to the next step.
Options for Raw Files
Photomatix Pro offers additional pre-processing options for Raw files. These options are automatically available when Raw files are loaded.

Merge to HDR Options window for Raw files
The White Balance option lets you change the white balance if desired, and preview the effect of changing it. The default value is "As Shot", which reads the white balance setting from the EXIF metadata. To adjust global white balance, either select a pre-defined value from the White Balance drop-down list, or select Custom and then type a Kelvin color temperature value in the text box.
The Apply per photo... button loads the median image of your bracketed set for White Balance preview, so you can see the effect of different settings applied to your image set. It also offers controls that allow you to apply two different White Balance settings to the brighter vs. the darker images in your bracketed set, before it is merged into a single HDR image. The purpose of this feature is to help avoid the color cast differences in a merged image, sometimes caused when the dark vs. the light areas of a scene are lit by two different temperature light sources.
Dual White Balance settings are useful, for example, when an artificially lit interior scene has a view to the outdoors. The ideal dual White Balance for an image set that captures this type of dual light source scene, might be the "Fluorescent" (3800K) setting for the longer exposures that capture primarily the interior artificially lit elements of the scene, and "Daylight" (5500K) for the shorter exposures that capture primarily the sunlit elements of the scene. This dual WB technique can help minimize unwanted color cast differences between sections of a scene that are lit by different temperature light sources.
The Color Primaries drop-down list provides options for converting the Raw data from the camera's native color space to the display profile of the selected value. Adobe RGB is the default value, and is appropriate when you want to print the resulting image. If you would like to display the resulting image only on the web and do not intend to print it, then select sRGB to avoid having to convert the image from Adobe RGB to sRGB.
The Apply lens correction for lens option will be displayed if the lens used to take the photos is recognized. This option applies lens correction that help compensate for pincushion and barrel distortion, and other typical lens defects that are introduced to some degree by even the finest lenses. The combo-box lists lens profiles that match the lens information read in the image's EXIF data. If multiple correction options are shown, perhaps from a family of related lenses, choose the specific lens variation that you used for your photo.
Dual White Balance Selection Window
To preview a WB setting, select it from the menu at the top of the window. The setting will automatically apply. WB values from 2000K to 50000K are also available, by selecting Custom and typing the desired value. To preview a Custom WB, press Tab.
While previewing WB settings, check the resulting color cast in dark areas vs. in light areas, especially if the different areas are lit by different types of light source. If it appears that a different WB gives best results in dark areas vs. in light areas, then the dark vs. the light source photos in your bracketed set might benefit from dual WB, in order to produce a more tone-consistent image.
After previewing the effect of different WB values on the photo at median exposure, work with the controls at the right of this window to apply your preferred setting(s) to all photos in the bracketed set.

Merge to HDR Options window for Raw files
To apply a single overall White Balance setting:
- Select it from the Apply menu, and click the Apply button.
To apply a dual White Balance setting:
- Select your WB choice for the lighter image areas, select Normal & overexposed photos, and click Apply.
- Select your WB choice for the darker image areas, select Underexposed photos, and click Apply.
Click OK to confirm your WB changes, and close the window.
The Deghosting Options Window
Select Show options to remove ghosts in the Preprocessing Options window, to subsequently access the Deghosting Options window.

The Deghosting Options window
The Deghosting Options window provides two deghosting methods:
- A manually applied Selective Deghosting Tool
- An adjustable Automatic Deghosting algorithm.
The Selective Deghosting Tool enables you to lasso-select the specific areas of the image that require processing to remove ghosting caused by image to image movement of elements in the scene. Photomatix Pro uses the single image that it deems best exposed for each selected area's brightness, as the default deghosting target image. You may change the automatically selected deghosting target image to any other image of your choice using the tool. It also allows you to save a ghosting mask to reuse later in the Deghosting Options window, or use in Batch processing.
Automatic Deghosting processes the entire image with an automated ghost reduction algorithm. It is useful for scenes with many small changes image to image, which are not practical to lasso manually. This deghosting method has the disadvantage of potentially degrading image quality, depending upon the nature of the scene, the type of ghosting, the number of source frames, and other factors. When applying Automatic Deghosting, use the lowest setting that successfully deghosts the image.
Using the Selective Deghosting Tool
To use the Selective Deghosting tool, click and drag the mouse to draw a lasso around a region that requires deghosting. Ensure that the dashed line forms a fully closed loop.
Right-click (Windows) or control-click (Mac) inside the selected region and select Mark selection as ghosted area from the pop-up menu. The line around the selected area changes from dashed to solid, to indicate that the area is now selected for deghosting. You may make additional deghosting selections, following these same steps, to mark other image areas for deghosting.

A dotted selection being marked for deghosting
At any time, use the Brightness slider to increase or decrease the brightness of the image. Or, use the Zoom slider to zoom in and out.
If necessary, you can remove a region from the deghosting selection. Control click or right click inside an already marked region and click Remove selection from the pop-up menu.
You may also change the image used as the deghosting target. Control-click or right-click inside an already marked region and click Set another photo for selection from the pop-up menu. The tool displays a pop-up menu with a list of the available exposures. Select an exposure value from the list.

Right-clicking a marked selection, to choose a different replacement photo
The photo that the tool automatically sets for the selection is not always the most appropriate exposure choice. It is thus a good idea to check whether changing to another photo produces a better deghosting result.
To view a preview of the deghosted image, click Preview deghosting. To make more selections or modify existing regions selected for deghosting, click Return to selection mode. You may continue selecting regions of the image and previewing the results until you are satisfied with the results.
In Quick Selection Mode, every completed selection lasso will automatically be converted into a deghosting selection, without the need to individually "Mark selection as ghosted area".
Saving and Loading Ghosting Masks
After the ghosted areas have been selected and marked as ghosted areas, you can save a mask of the selection to use later. Click on the Save Mask... button. Choose the file name and location you want to save the mask, and click Save.
To load the mask on subsequent merged images, return to the Deghosting Options window and click Load Mask.... Navigate to the location you saved the file and select the .pmmask file. Click the Load button.
Using Automatic Deghosting
The Automatic Deghosting option automatically detects ghosted areas in the image. The deghosting slider sets the "aggressiveness" of ghosting detection.
Aggressive Deghosting setting removes more ghosting artifacts, but increases the possibility and severity of unwanted artifacts. Use as low a setting as possible, to maximize the quality of the merged HDR image.
If you need high settings to remove ghosts completely, it is recommended that you use the manually applied Selective Deghosting Tool instead, if possible.
When automatic deghosting is used, one of the source photos is used to create the HDR image in areas detected as ghosted. The Base Photo is the one selected to do this. By default this is the median exposure, but you can select one of the other photos instead by clicking on its thumbnail.
After using the Selective Deghosting Tool, or applying Automatic Deghosting, click OK to apply the deghosting adjustments to the image, or click Cancel to stop merging the images.
If you wish to continue working with the current bracketed set without deghosting applied, then set the Automatic Deghosting amount to "0", or make no Selective Deghosting Tool selections, and simply click OK to proceed.
Note
Deghosting works with all HDR adjustment methods (Details Enhancer, Contrast Optimizer, Tone Balancer and Tone Compressor) and with the Fusion/Natural method. Deghosting however is not applicable to any of the other Exposure Fusion methods.
Working with Single Image Files
Photomatix Pro supports HDR adjustment of single image files. To load a single image file:
- Drag and drop the file onto the Photomatix Pro app, or onto the app icon.
Or, click on the Browse button of the window that shows at start up. - A file browser window displays.
Navigate to the file and open it. - To process the image, click Next: Adjust.
Note
Some Presets, particularly those in the "Artistic" style, make any noise present in the image much more visible. This is why it is a good idea to use noise reduction before adjusting the image, especially when processing a single image.
Options for Single Raw Image Files
When your single image is a Raw file, Photomatix must first convert the Raw data. The following options are available for pre-processing the Raw data.

Single image Raw Processing Options
The Reduce noise option processes the converted Raw file with a high-quality noise reduction algorithm. It is checked by default as reducing noise is always recommended when processing Raw files. The Strength slider lets you increase or decrease the strength of the noise reduction relative to the automatically determined value based on the noise level in the image. Values range from 50% to 150%.
Enable Exposure Fusion allows a single image to be processed using Fusion methods. Normally, Fusion methods only apply to multiple image sets. This option will split the single Raw file into darker and lighter images, which can then be adjusted using Exposure Fusion-based presets, such as the 'Natural' preset, for instance.
The Reduce chromatic aberrations option automatically corrects color fringing due to lens chromatic aberrations.
The White Balance options let you change the white balance, if desired, and preview the effect of changing it. The default value is "As Shot", which reads the white balance from the EXIF metadata. To adjust the white balance, select an item from the White Balance drop-down list or type a color temperature in Kelvin in the text box.
Click Preview sample to view the effect of the white balance change on the source image.
The Color Space drop-down list provides options for converting the Raw data from the camera's native color space to the display profile of the selected value. Adobe RGB is the default value and is appropriate when you want to print the resulting image. Select sRGB for web-only images, to avoid having to convert the image from Adobe RGB to sRGB.
The Apply lens correction for lens option will be displayed if the lens used to take the photos is recognized. This option applies lens correction that help compensate for pincushion and barrel distortion, and other typical lens defects that are introduced to some degree by even the finest lenses. The combo-box lists lens profiles that match the lens information read in the image's EXIF data. If multiple correction options are shown, perhaps from a family of related lenses, choose the specific lens variation that you used for your photo.
Using Third-Party Raw Converters
When processing Raw files in a third-party Raw converter, develop the Raw images with the following settings.
- White Balance: Use the same white balance for all source photos.
- Basic settings: Set all to zero. It is particularly important to set the Blacks setting to zero.
- Curves: Parametric and Point Curves should be linear.
- Details: (Not shown below.) Set the Sharpening Amount to zero.
As an example, these screenshots show our recommended Raw processing settings, applied in Lightroom Classic:

Basic Settings in Lightroom

Working with curves in Lightroom
Photomatix Pro and Color Management
Photomatix Pro supports color management even if RAW files are processed. You should use the same working space in Photomatix Pro as you use in other image editors (e.g. Photoshop).
Photomatix supports the three most popular working spaces:
- sRGB: Use if the images are created only for the web.
- Adobe RGB: Popular working space for printing if extremely saturated colors are not used.
- ProPhoto RGB: Wide gamut working space. This should never be used for 8-bit images.
For all JPEG and TIFF files, Photomatix Pro preserves the color spaces of the source files.