The heart of Photomatix Pro is where you adjust the image with various HDR styles. The image adjustment interface has three main sections: Adjustments Panel on the left, Preview in the middle, Presets Panel on the right.
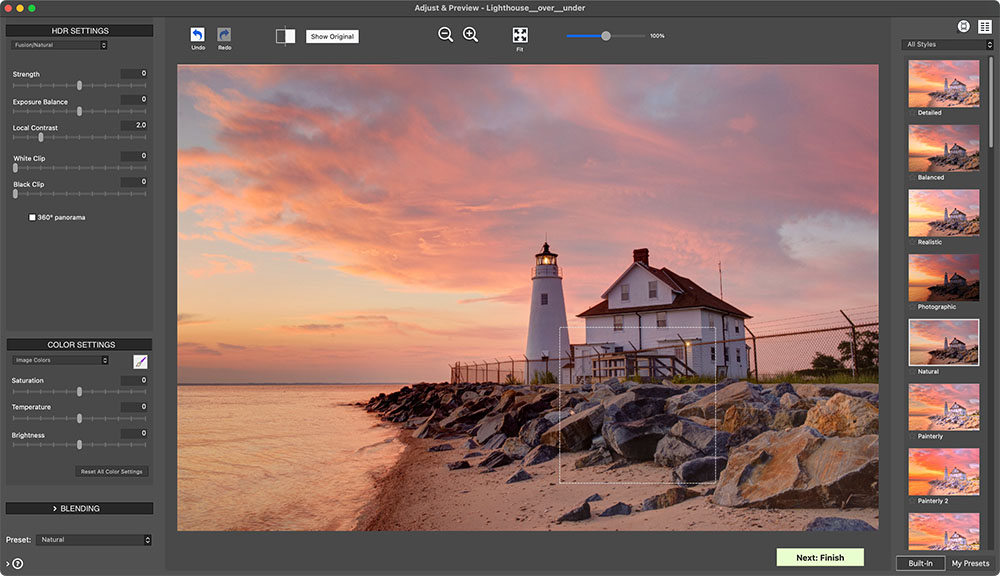
The Adjust & Preview Window
Image adjustment workflow
After you have merged your source images (or opened a single image file), the main workflow steps are:
Choose a style by selecting a thumbnail in the Presets Panel, either a built-in preset delivered with Photomatix Pro, or a custom preset that you have created.
You can refine the effect of the Preset using the controls in the HDR Settings and Color Settings sections (see descriptions of each setting in Section 8: Settings). You can also selectively assign settings to specific parts of your image, using the Brush Tool (see Section 4: Brush / Lasso Tool).
Note
To undo or redo your adjustment steps, click the undo / redo arrows in the Adjustments panel. For multiple undo or redo steps, click multiple times.
When you are satisfied with the preview result, click on the Next: Finish button at the bottom of the Adjustments panel. This will apply the selected preset and settings adjustments to the image, at its original resolution.
Before saving the image, you can use the options on the Finishing Touch palette in order to increase the Contrast of your image, Sharpen it, Crop it or Straighten it.
Choose File > Save As to save the image.
Note
The settings you selected are automatically embedded in the saved processed image. To view the settings, click View Settings from the Workflow Shortcuts panel.
You can try other adjustment on the same image, without having to load and merge the photos again:
- Selecting Redo With Other Settings in the Workflow Shortcuts panel allows you to start fresh with the current image, and apply another preset or settings.
- Selecting Double HDR Effect allows you to add additional effects, using your already-processed image as a starting point for additional adjustment.
Note
Presets from Fusion HDR methods (e.g. the “Natural” preset) are only available when you have loaded bracketed photos. If you loaded a single Raw file, however, you can still use Fusion presets if you select “Enable Exposure Fusion".
Workflow Differences when using the Lightroom or the Capture One Plugin
If you are using the Export to Photomatix Pro plugin for Lightroom Classic or the Merge to HDR in Photomatix Pro plugin for Capture One, the image adjustment workflow described above stops at step 4. Additionally, the button that returns the adjusted image to Lightroom or Capture One will be named Save & Reimport instead of Done.
In the case of the plugin for Lightroom, note that you will have to make sure the Automatically reimport into Lightroom library option is checked to get the saved HDR image automatically reimported into Lightroom.
Save As Dialog
To save your image, choose File > Save As, navigate to the folder where you want to save the image, and use the default file name or enter a new name in the File name field. Then, select a file type among the three offered.
JPEG is best if you want to go straight to the Web with no further processing.
TIFF 16-bit offers the highest quality output and is the best format if you plan on processing the image further in an image editor.
If you would like to automatically reimport the saved image into another photo or image application, check Open Saved Images with and select an application from the drop-down list. If the desired photo application is not on the list, click Add application..., navigate to the folder that contains the application, and select it.
If you would like to save your image at a specific pixel size/resolution, use the Save with Size option. There are various standard image export size options.
Note
By default, the file name of the adjusted image is suffixed by either the name of the Preset you selected or the name of the method used when you adjusted the image with custom settings. You can change this rule or set your own suffix under the Files tab of the Preferences panel.
Image Adjustment Interface
The image adjustment interface consists of three main sections: The setting Adjustments Panel, the image Preview, and the thumbnail Presets Panel.

Image adjustment Preview panel controls
Preview
The Preview displays the image adjusted with your current Preset and settings, and is updated immediately after a Preset or setting has been changed. The Preview panel provides the following controls.
Note
When using the Details Enhancer or Contrast Optimizer methods, the Preview is not always an accurate representation of the final HDR image.

Undo / Redo: Undo allows you to step backwards though your most recent adjustments, removing them one by one. You can Redo any Undo steps, if you wish to keep your recent adjustments after all.

Split View: Clicking the Split View button temporarily removes the HDR adjusted preview from the left half of the image. This allows you to compare your original unprocessed image to the adjusted image. To return to adjusting your image, click the Split View button a 2nd time.

Show Original/Show Preview: Toggles between a preview of the image and the “normal” exposure (0EV) of the set. This is helpful to for evaluating your current effect settings.

Magnify icons +/-: Increases or decreases image preview size by 20%, and re-processes it at the new size.

Fit: Resizes the preview to fill the available space in the Preview panel.

Scaling Slider: Zooms in or out the refreshed preview from 50% to 150%. The preview is not re-processed but is simply scaled. When Fit or one of the Magnify icons is clicked, the Preview is not simply scaled but is re-processed, and the Zoom Slider is reset to 100%

Histogram: This floating window contains four tabbed histograms: Luminance, Red, Green, and Blue. In addition, you can move the mouse back and forth across the histogram to display Level, Count, and Percentile information. If the histogram is turned off, enable it by selecting 8-bit Histogram from the View menu.
Important Note
The Loupe may not properly show the effect of some settings, especially Details Enhancer's Micro-smoothing setting, when the area magnified is uniform. If you want to see the effect of the Micro-smoothing setting at 100% resolution on a uniform area such as the sky, you will have to select an area that contains an object in the scene in addition to the sky.
Working with Presets

Preset panel, All Styles
Single column, large thumbs
Preset Thumbnails Panel
The Presets panel lists the available presets, showing a thumbnail preview of the effect of that preset. When you click on a preset thumbnail, the Preview image is refreshed to show the result of adjusting it according to the settings of that preset.
By default, the panel displays one column of small thumbnails. Click on the “+” icon on the top of the panel to enlarge the thumbnails. Click on the icon on the top right of the panel to display the thumbnails in two columns.
There are two types of presets, "Built-in" factory presets, and "My Presets". "My Presets" are your customized presets – those that you have carefully refined to match your tastes and your images – as well as presets that you may have collected from other Photomatix users.
Built-in Presets
Built-in or “factory” presets are those provided with the software. Photomatix Pro offers 41 built-in presets when you are working with bracketed photo sets, and 34 built-in presets for when you are working with single photo files.
The drop-down list at the top of the Presets panel lets you filter presets by categories. There are four categories of built-in presets which correspond to effect styles (Artistic, Realistic, Architecture and Black & White) and five categories which correspond to HDR styles (Details Enhancer, Contrast Optimizer, Tone Balancer, Tone Compressor and Fusion).
The Compact List item displays a selected subset of presets from all categories. The Favorites item displays only presets you have marked as favorite. See more details on Favorite presets at the end of this section.
Custom Presets
Custom presets are presets that you saved while adjusting your images, or presets created by other Photomatix users that you have imported.
To access custom presets, click on the My Presets tab located at the bottom of the Preset Thumbnails panel. To create your own custom presets, refer to the Saving Custom Presets paragraph below.
You can also import custom presets created by other Photomatix users which you have saved to your computer as XMP files. To import these presets, select the Import Presets… item in the pop-up menu on the top left of the Preset Thumbnails panel, and browse to the location on your computer where you downloaded the XMP preset files.
Note
If you save the preset in the default location (which is the Presets folder of the Photomatix Pro application), the preset is automatically added to the Presets combo-box list, and also shows in the My Presets tab of the thumbnail Presets Panel.
Saving Custom Presets

Artistic Style Presets
Two columns, small thumbs
There are two ways to save custom presets as an XMP file for future use: during the image adjustment phase, or after HDR processing is complete. To save custom presets during image adjustment:
- In the Adjustments panel, at the left side of the Preview window, click the Presets drop-down list.
- Select Save Preset from the list.
- Enter a name for the preset in the File name field, and click Save.
To save the selected settings as a preset after you have already applied the settings or saved the image:
- Click Save Preset from the Workflow Shortcuts panel or select Save Preset from the File menu.
- A dialog prompts for the file name.
- Enter the file name, and click OK.
Favorite Presets
You can mark presets as favorites, so that you can then filter the preset list to see just those favorites. To mark a preset as a favorite, click on the grey star icon on the left of the preset's name. The star turns yellow, indicating a "favorited" preset. You can un-favorite a preset by clicking again on its yellow star.
Color Adjustments
The Color Settings section is identical for all HDR adjustment methods. It consists of Saturation, Brightness and a Hue / Temperature setting.
When adjusting an individual image color, the Hue setting is available. It allows you to push a given color towards either of its neighboring colors in the spectrum. For example, Orange colors can be pushed towards either Yellow or Red. When you are not constraining your color adjustment to a single image color, and you are adjusting overall color instead, the Temperature setting is available. Temperature controls the overall warmth or coolness of your image.
Constrain your color adjustments to a specific image color, by selecting that color in the Color Settings menu. Or leave the default Image Colors setting, which applies your adjustments to all colors. Selecting Red can target your adjustments to just a single red rose in a bouquet of differently colored flowers. Selecting Green can target your adjustments to a patch of vegetation. Selecting Cyan or Blue can constrain your adjustments to the sky, for example, depending on the hue of the specific sky in your image.
As described next in the Brush / Lasso Tool section, you not only are able to constrain your color adjustments to specific colors of an image. You can also constrain them to specific sections of an image. This allows you to have multiple Selections which adjust the same image color, but in different ways: "This green area should be more saturated... This other green area should be darkened..."

Adjusting all color in the image

Adjusting only the blue shades and hues